Hello everyone,
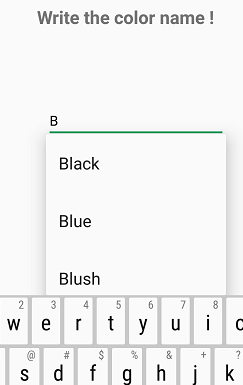
When you use a Search Engine Website, like Google or Bing, you type one or two character, the engine will give you some completed keywords or results. I will help you to find exactly what you want to find. So in Android Application, you can also do that, and it is very simple. Not, let’s start it.
For Example:

To do this demo, you have to know about TextWatcher and AutoCompleteTextView
1 – Create new project: File -> New -> Android Application Project: DemoAutoSearch.
2 – Open main_activity.xml in res/layout and type following code:
|
1
2
3
4
5
6
7
8
9
10
11
12
13
14
15
16
17
18
19
20
21
|
<LinearLayout xmlns:android=“http://schemas.android.com/apk/res/android”
xmlns:tools=“http://schemas.android.com/tools”
android:layout_width=“match_parent”
android:layout_height=“match_parent”
android:orientation=“vertical”
tools:context=“.MainActivity” >
<TextView
android:layout_width=“fill_parent”
android:layout_height=“wrap_content”
android:id=“@+id/text”
android:text=“Demo Auto Search”
/>
<AutoCompleteTextView
android:id=“@+id/autotext”
android:layout_width=“fill_parent”
android:layout_height=“wrap_content”
android:completionThreshold=“1”
/>
</LinearLayout>
|
P/S: android:completionThreshold=”1″ means that the complete result will be displayed when user inputs 1 character in search field. If you want the complete result is displayed when you input 2 characters, change android:completionThreshold to 2.
3 – Open MainActivity.java in res/com.devandroidtips.demoautosearch/src and type following code
|
1
2
3
4
5
6
7
8
9
10
11
12
13
14
15
16
17
18
19
20
21
22
23
24
25
26
27
28
29
30
31
32
33
34
35
36
37
38
39
40
41
42
43
44
45
46
47
48
49
|
public class MainActivity extends Activity implements TextWatcher {
// Create an Array for TextView
String[] items = {“Adobe Photoshop CS6”, “Adobe Lightroom 5”, “Adobe Flash”, “Adobe Ultra”
, “Canon EOS 30D”, “Canon EOS 40D”, “Canon EOS 5D”, “Nikon D40”, “Nikon D90”};
AutoCompleteTextView autotext;
TextView text;
@Override
protected void onCreate(Bundle savedInstanceState) {
super.onCreate(savedInstanceState);
setContentView(R.layout.activity_main);
autotext = (AutoCompleteTextView)findViewById(R.id.autotext);
autotext.addTextChangedListener(this);
autotext.setAdapter(new ArrayAdapter<String>(this, android.R.layout.simple_dropdown_item_1line, items));
text = (TextView)findViewById(R.id.text);
}
@Override
public boolean onCreateOptionsMenu(Menu menu) {
// Inflate the menu; this adds items to the action bar if it is present.
getMenuInflater().inflate(R.menu.main, menu);
return true;
}
@Override
public void afterTextChanged(Editable s) {
// TODO Auto-generated method stub
}
@Override
public void beforeTextChanged(CharSequence s, int start, int count,
int after) {
// TODO Auto-generated method stub
}
@Override
public void onTextChanged(CharSequence s, int start, int before, int count) {
// TODO Auto-generated method stub
text.setText(autotext.getText());
}
}
|
4 – OK, now use your Autocomplete search application.

